Upgrade Proxmox ZFS boot drive with mirroring

From https://pve.proxmox.com/pve-docs/chapter-sysadmin.html#chapter_zfs

# zpool status
pool: rpool
state: ONLINE
scan: resilvered 9.32M in 00:00:00 with 0 errors on Thu Apr 3 23:20:51 2025
config:

NAME STATE READ WRITE CKSUM
rpool ONLINE 0 0 0
nvme-eui.0025388581b66796-part3 ONLINE 0 0 0
# lsblk
NAME MAJ:MIN RM SIZE RO TYPE MOUNTPOINTS
sda 8:0 0 1.8T 0 disk
--sda1 8:1 0 1.8T 0 part
zd16 230:16 0 32G 0 disk
--zd16p1 230:17 0 100M 0 part
--zd16p2 230:18 0 892M 0 part
--zd16p3 230:19 0 31G 0 part
zd32 230:32 0 10G 0 disk
--zd32p1 230:33 0 9.5G 0 part
--zd32p2 230:34 0 1K 0 part
--zd32p5 230:37 0 510M 0 part
nvme0n1 259:0 0 476.9G 0 disk
--nvme0n1p1 259:1 0 1007K 0 part
--nvme0n1p2 259:2 0 1G 0 part
--nvme0n1p3 259:3 0 475.9G 0 part

Duplicate the partition tables on the new drive (/dev/sda)

# sgdisk /dev/nvme0n1 -R /dev/sda

change the GUID so they are not the same

# sgdisk -G /dev/sda

Use parted to fdisk to expand partition 3 into the full capacity of the new disk

# fdisk /dev/sda

Welcome to fdisk (util-linux 2.38.1).
Changes will remain in memory only, until you decide to write them.
Be careful before using the write command.


Command (m for help): p
Disk /dev/sda: 1.82 TiB, 2000398934016 bytes, 3907029168 sectors
Disk model: SSD
Units: sectors of 1 * 512 = 512 bytes
Sector size (logical/physical): 512 bytes / 512 bytes
I/O size (minimum/optimal): 512 bytes / 512 bytes
Disklabel type: gpt
Disk identifier: 126F0F8E-624E-4F4D-8CD4-89F8B2EDE74A

Device Start End Sectors Size Type
/dev/sda1 34 2047 2014 1007K BIOS boot
/dev/sda2 2048 2099199 2097152 1G EFI System
/dev/sda3 2099200 1000215182 998115983 475.9G Solaris /usr & Apple ZFS

Command (m for help): d
Partition number (1-3, default 3): 3

Partition 3 has been deleted.

Command (m for help): n
Partition number (3-128, default 3): 3
First sector (2099200-3907029134, default 2099200):
Last sector, +/-sectors or +/-size{K,M,G,T,P} (2099200-3907029134, default 3907028991):

Created a new partition 3 of type 'Linux filesystem' and of size 1.8 TiB.

Command (m for help): p
Disk /dev/sda: 1.82 TiB, 2000398934016 bytes, 3907029168 sectors
Disk model: SSD
Units: sectors of 1 * 512 = 512 bytes
Sector size (logical/physical): 512 bytes / 512 bytes
I/O size (minimum/optimal): 512 bytes / 512 bytes
Disklabel type: gpt
Disk identifier: 126F0F8E-624E-4F4D-8CD4-89F8B2EDE74A

Device Start End Sectors Size Type
/dev/sda1 34 2047 2014 1007K BIOS boot
/dev/sda2 2048 2099199 2097152 1G EFI System
/dev/sda3 2099200 3907028991 3904929792 1.8T Linux filesystem

Command (m for help):

Change the label back to “Solaris /usr & Apple ZFS”

Command (m for help): t
Partition number (1-3, default 3): 3
Partition type or alias (type L to list all): 157

Changed type of partition 'Linux filesystem' to 'Solaris /usr & Apple ZFS'.

Command (m for help): p
Disk /dev/sda: 1.82 TiB, 2000398934016 bytes, 3907029168 sectors
Disk model: SSD
Units: sectors of 1 * 512 = 512 bytes
Sector size (logical/physical): 512 bytes / 512 bytes
I/O size (minimum/optimal): 512 bytes / 512 bytes
Disklabel type: gpt
Disk identifier: 126F0F8E-624E-4F4D-8CD4-89F8B2EDE74A

Device Start End Sectors Size Type
/dev/sda1 34 2047 2014 1007K BIOS boot
/dev/sda2 2048 2099199 2097152 1G EFI System
/dev/sda3 2099200 3907028991 3904929792 1.8T Solaris /usr & Apple ZFS

Command (m for help): w
The partition table has been altered.
Calling ioctl() to re-read partition table.
Syncing disks.

Check what type of boot partition you have (Grub / EUFI)

# proxmox-boot-tool status
Re-executing '/usr/sbin/proxmox-boot-tool' in new private mount namespace..
System currently booted with uefi
F0A5-6343 is configured with: uefi (versions: 6.8.12-4-pve, 6.8.12-9-pve)

Copy boot partition detail to the new disk

# proxmox-boot-tool format /dev/sda2
UUID="" SIZE="1073741824" FSTYPE="" PARTTYPE="c12a7328-f81f-11d2-ba4b-00a0c93ec93b" PKNAME="sda" MOUNTPOINT=""
Formatting '/dev/sda2' as vfat..
mkfs.fat 4.2 (2021-01-31)
Done.
# proxmox-boot-tool init /dev/sda2
Re-executing '/usr/sbin/proxmox-boot-tool' in new private mount namespace..
UUID="F84D-06C6" SIZE="1073741824" FSTYPE="vfat" PARTTYPE="c12a7328-f81f-11d2-ba4b-00a0c93ec93b" PKNAME="sda" MOUNTPOINT=""
Mounting '/dev/sda2' on '/var/tmp/espmounts/F84D-06C6'.
Installing systemd-boot..
Created "/var/tmp/espmounts/F84D-06C6/EFI/systemd".
Created "/var/tmp/espmounts/F84D-06C6/EFI/BOOT".
Created "/var/tmp/espmounts/F84D-06C6/loader".
Created "/var/tmp/espmounts/F84D-06C6/loader/entries".
Created "/var/tmp/espmounts/F84D-06C6/EFI/Linux".
Copied "/usr/lib/systemd/boot/efi/systemd-bootx64.efi" to "/var/tmp/espmounts/F84D-06C6/EFI/systemd/systemd-bootx64.efi".
Copied "/usr/lib/systemd/boot/efi/systemd-bootx64.efi" to "/var/tmp/espmounts/F84D-06C6/EFI/BOOT/BOOTX64.EFI".
Random seed file /var/tmp/espmounts/F84D-06C6/loader/random-seed successfully written (32 bytes).
Created EFI boot entry "Linux Boot Manager".
Configuring systemd-boot..
Unmounting '/dev/sda2'.
Adding '/dev/sda2' to list of synced ESPs..
Refreshing kernels and initrds..
Running hook script 'proxmox-auto-removal'..
Running hook script 'zz-proxmox-boot'..
Copying and configuring kernels on /dev/disk/by-uuid/F0A5-6343
Copying kernel and creating boot-entry for 6.8.12-4-pve
Copying kernel and creating boot-entry for 6.8.12-9-pve
Copying and configuring kernels on /dev/disk/by-uuid/F84D-06C6
Copying kernel and creating boot-entry for 6.8.12-4-pve
Copying kernel and creating boot-entry for 6.8.12-9-pve

Add the new disk to rpool as a mirror device. Important – you have to use partition 3, not the just the disk designation.

# zpool status
pool: rpool
state: ONLINE
scan: resilvered 9.32M in 00:00:00 with 0 errors on Thu Apr 3 23:20:51 2025
config:

NAME                            STATE READ WRITE CKSUM
rpool                           ONLINE 0 0 0
nvme-eui.0025388581b66796-part3 ONLINE 0 0 0

errors: No known data errors

# zpool attach rpool nvme-eui.0025388581b66796-part3 /dev/sda3

# zpool status
pool: rpool
state: ONLINE
status: One or more devices is currently being resilvered. The pool will
continue to function, possibly in a degraded state.
action: Wait for the resilver to complete.
scan: resilver in progress since Fri Apr 4 03:35:18 2025
378G / 378G scanned, 853M / 378G issued at 35.5M/s
841M resilvered, 0.22% done, 03:01:01 to go
config:

NAME                              STATE READ WRITE CKSUM
rpool                             ONLINE 0 0 0
mirror-0                          ONLINE 0 0 0
  nvme-eui.0025388581b66796-part3 ONLINE 0 0 0
  sda3                            ONLINE 0 0 0 (resilvering)

errors: No known data errors
# zpool status
pool: rpool
state: ONLINE
scan: resilvered 371G in 03:10:09 with 0 errors on Sat Apr 5 11:24:50 2025
config:

NAME                              STATE READ WRITE CKSUM
rpool                             ONLINE 0 0 0
mirror-0                          ONLINE 0 0 0
  nvme-eui.0025388581b65b82-part3 ONLINE 0 0 0
  sda3                            ONLINE 0 0 0

Once synced up, Power off and replace the old drive with the new drive.  System should still boot if UEFI.

Once booted, you’ll have a degraded mirror,  you can safely remove the old drive

# zpool status
pool: rpool
state: DEGRADED
status: One or more devices could not be used because the label is missing or
invalid. Sufficient replicas exist for the pool to continue
functioning in a degraded state.
action: Replace the device using 'zpool replace'.
see: https://openzfs.github.io/openzfs-docs/msg/ZFS-8000-4J
scan: resilvered 371G in 03:10:09 with 0 errors on Sat Apr 5 11:24:50 2025
config:

NAME STATE READ WRITE CKSUM
rpool DEGRADED 0 0 0
mirror-0 DEGRADED 0 0 0
14929228184534084580 UNAVAIL 0 0 0 was /dev/disk/by-id/nvme-eui.0025388581b65b82-part3
nvme0n1p3 ONLINE 0 0 0

errors: No known data errors

# zpool detach rpool 14929228184534084580

# zpool list
NAME SIZE ALLOC FREE CKPOINT EXPANDSZ FRAG CAP DEDUP HEALTH ALTROOT
rpool 472G 367G 105G - 1.35T 21% 77% 1.00x ONLINE -

If you expanded partition 3 to be larger, tell zfs that you want to expand into the available space.

# zpool set autoexpand=on rpool
# zpool online -e rpool nvme0n1p3
# zpool list
NAME SIZE ALLOC FREE CKPOINT EXPANDSZ FRAG CAP DEDUP HEALTH ALTROOT
rpool 1.82T 367G 1.46T - - 5% 19% 1.00x ONLINE -


Proxmox GPU Passthrough for LXC for Docker, for apps WebODM, immich

Proxmox GPU Passthrough for Docker using LXC to host WebODM with ClusterODM

References:


Remove Old NVIDIA Drivers

  1. List existing NVIDIA or CUDA packages:
    apt list --installed | egrep -i "nvidia|cuda" | cut -d/ -f1
  2. If drivers are listed, uninstall the current NVIDIA runfile driver:
    sudo ./NVIDIA-Linux-*.run --uninstall
  3. Re-check installed packages:
    apt list --installed | egrep -i "nvidia|cuda" | cut -d/ -f1
  4. If any packages remain, remove them:
    apt list --installed | egrep -i "nvidia|cuda" | cut -d/ -f1 | xargs apt remove -y

Setting Up GPU Passthrough on Proxmox Server

  1. Install required packages:
    apt install pve-headers dkms pciutils
  2. Edit /etc/default/grub and update:
    GRUB_CMDLINE_LINUX_DEFAULT="quiet intel_iommu=on iommu=pt"
  3. Update grub:
    update-grub2
  4. Blacklist default GPU drivers:
    echo "blacklist nvidia" >> /etc/modprobe.d/blacklist.conf
    echo "blacklist nouveau" >> /etc/modprobe.d/blacklist.conf
    echo "blacklist radeon" >> /etc/modprobe.d/blacklist.conf
  5. Add to /etc/modules:
    vfio
    vfio_iommu_type1
    vfio_pci
    vfio_virqfd
  6. Update initramfs:
    update-initramfs -u -k all
  7. Reboot the Proxmox server.
  8. Download NVIDIA driver (from NVIDIA Drivers). This document uses the official NVIDIA driver runfile. The distro version can break with apt updates.
    Example:

    NVIDIA-Linux-x86_64-570.133.07.run
  9. Set the installer as executable:
    chmod +x NVIDIA-Linux-*.run
  10. Run the installer:
    ./NVIDIA-Linux-*.run
  11. Reboot the Proxmox server again.
  12. Check installation:
    nvidia-smi
  13. Check NVIDIA device IDs:
    ls -al /dev/nvidia*
    Example output:

    crw-rw-rw- 1 root root 195,   0 /dev/nvidia0
    crw-rw-rw- 1 root root 195, 255 /dev/nvidiactl
    crw-rw-rw- 1 root root 509,   0 /dev/nvidia-uvm
    crw-rw-rw- 1 root root 509,   1 /dev/nvidia-uvm-tools

    Note device IDs like 195, 235, 255, 509.

  14. Edit LXC config file at /etc/pve/lxc/<ID>.conf:
    lxc.cgroup2.devices.allow: c 195:* rwm
    lxc.cgroup2.devices.allow: c 235:* rwm
    lxc.cgroup2.devices.allow: c 255:* rwm
    lxc.cgroup2.devices.allow: c 509:* rwm
    lxc.mount.entry: /dev/nvidia0 /dev/nvidia0 none bind,optional,create=file
    lxc.mount.entry: /dev/nvidiactl /dev/nvidiactl none bind,optional,create=file
    lxc.mount.entry: /dev/nvidia-modeset /dev/nvidia-modeset none bind,optional,create=file
    lxc.mount.entry: /dev/nvidia-uvm /dev/nvidia-uvm none bind,optional,create=file
    lxc.mount.entry: /dev/nvidia-uvm-tools /dev/nvidia-uvm-tools none bind,optional,create=file
  15. Check nvidia-smi again:
    nvidia-smi

Set Up LXC Container for Docker

  1. Install tools:
    apt install pciutils
  2. Install NVIDIA driver again with:
    ./NVIDIA-Linux-*.run --no-kernel-modules
  3. Install APT prerequisites:
    apt update
    apt install -y apt-transport-https ca-certificates curl gnupg lsb-release
  4. Add NVIDIA APT repo:
    curl -fsSL https://nvidia.github.io/libnvidia-container/gpgkey | sudo gpg --dearmor -o /usr/share/keyrings/nvidia-container-toolkit-keyring.gpg \
    && curl -s -L https://nvidia.github.io/libnvidia-container/stable/deb/nvidia-container-toolkit.list | \
    sed 's#deb https://#deb [signed-by=/usr/share/keyrings/nvidia-container-toolkit-keyring.gpg] https://#g' | \
    sudo tee /etc/apt/sources.list.d/nvidia-container-toolkit.list
  5. Update package list:
    apt update
  6. Install NVIDIA Container Toolkit:
    apt install -y nvidia-container-toolkit
  7. Configure Docker to use NVIDIA runtime:
    sudo nvidia-ctk runtime configure --runtime=docker
  8. Restart Docker:
    sudo systemctl restart docker
  9. Verify GPU inside container:
    nvidia-smi
    Example output:

    +-----------------------------------------------------------------------------------------+
    | NVIDIA-SMI 570.133.07             Driver Version: 570.133.07     CUDA Version: 12.8     |
    |-----------------------------------------+------------------------+----------------------+
    | GPU  Name                 Persistence-M | Bus-Id          Disp.A | Volatile Uncorr. ECC |
    | Fan  Temp   Perf          Pwr:Usage/Cap |           Memory-Usage | GPU-Util  Compute M. |
    |                                         |                        |               MIG M. |
    |=========================================+========================+======================|
    |   0  Quadro P600                    On  |   00000000:01:00.0 Off |                  N/A |
    |  0%   37C    P8            N/A  /  N/A  |       3MiB /   2048MiB |      0%      Default |
    +-----------------------------------------+------------------------+----------------------+
    | Processes:                                                                              |
    |  No running processes found                                                             |
    +-----------------------------------------------------------------------------------------+

Reference: NVIDIA Container Toolkit Installation Guide


WebODM + ClusterODM (Docker Setup)

docker run -d --rm -ti -p 3000:3000 -p 10000:10000 -p 8080:8080 opendronemap/clusterodm

Run on the worker node:

docker run -d -p 3001:3000 opendronemap/nodeodm:gpu --gpus all --restart always
./webodm.sh start --default-nodes 0 --detached --port 80

Connect Node in WebODM UI:
Go to: http://10.0.1.131:10000
Add Node: 10.0.1.131:3001


Configure Immich for GPU

(Adapted from: Immich Docs)

  1. Download the latest hwaccel.ml.yml file and place it in the same folder as docker-compose.yml.
  2. In docker-compose.yml, under immich-machine-learning, uncomment the extends section and change cpu to the appropriate backend.
  3. Also in immich-machine-learning, add one of: [armnn, cuda, rocm, openvino, rknn] to the image tag.
  4. Redeploy the immich-machine-learning container with the updated settings.

Using Fit-statUSB to provide visual server health in my homelab using proxmox

https://www.amazon.com/Compulab-FIT-STATUSB-fit-statUSB/dp/B07CKFLQ5V
#!/bin/bash

# Define color variables
BLUE="000011"
RED="010000"
YELLOW="050500"
GREEN="000100"
WHITE="111111"
OFF="000000"
DECAY="#FF0000"

# Initialize the serial port
usbreset fit_StatUSB
if [ $? -ne 0 ]; then
    echo "Device not found. Aborting."
    exit 1
fi

sleep 5
stty -F /dev/ttyACM0 9600 raw -echo -echoe -echok -echoctl -echoke
sleep 5

# Function to send a color command to Fit-statUSB
send_color() {
    echo Sending: "B#${1}-250#000000-1000${DECAY}-9999"
    echo -e "B#${1}-250#000000-1000${DECAY}-9999" > /dev/ttyACM0
    sleep 1
}

echo -e "F0001"     > /dev/ttyACM0; sleep 1 # Minimal Transition
echo -e "#${RED}"   > /dev/ttyACM0; sleep 1 # Red
echo -e "#${GREEN}" > /dev/ttyACM0; sleep 1 # Green
echo -e "#${BLUE}"  > /dev/ttyACM0; sleep 1 # Blue
echo -e "#${WHITE}" > /dev/ttyACM0; sleep 1 # White
echo -e "#${OFF}"   > /dev/ttyACM0; sleep 1 # Off

while true; do
    # Get processor idle time using vmstat
    idle=$(vmstat 1 2 | tail -1 | awk '{print $15}')

    # Get Proxmox health state
    expected_votes=$(pvecm status | grep 'Expected votes:' | awk '{print $2}')
    total_votes=$(pvecm status | grep 'Total votes:' | awk '{print $2}')
    flags=$(pvecm status | grep 'Flags:' | awk '{print $2}')

    if [ "$flags" != "Quorate" ]; then
        proxmox_status="$RED"
    elif [ "$expected_votes" != "$total_votes" ]; then
        proxmox_status="$YELLOW"
    else
        proxmox_status="$GREEN"
    fi

    # Check network connectivity
    if ping -c 1 8.8.8.8 &> /dev/null; then
        network_status="$GREEN"
    else
        network_status="$RED"
    fi

    # Determine processor state color
    if [ "$idle" -lt 10 ]; then
        processor_status="$RED"
    elif [ "$idle" -lt 20 ]; then
        processor_status="$YELLOW"
    else
        processor_status="$GREEN"
    fi

    # Repeat the sequences 6 times before re-evaluating the system state
    for i in {1..6}; do
        # Create and send blink sequence with breaks
        send_color "$BLUE" # Initial Blue indicating start of the dataset
        send_color "$processor_status"
        send_color "$proxmox_status"
        send_color "$network_status"
    done
done

Armbian custom builds for different SOCs, using docker

I’m impressed with how well Armbian works with SOCs. Since I couldn’t find a Raspberry Pi recently, I tried out a “LePotato” board, which has performed well overall. The main issue is the lack of a headless install option for Armbian. Without a FAT partition for /boot, configuring the OS on a PC or Mac before installation is challenging.

I attempted adding /boot to an existing image but struggled. Eventually, I found I could compile Armbian with a revised lepotato.conf file by adding BOOTFS_TYPE="fat". Typically, compiling OS builds requires specific hardware, compilers, libraries, etc., making it a hassle. However, Armbian’s DIY-focused approach made the process surprisingly easy. I even used Docker, so my main OS stayed clean—very cool indeed!


From: https://docs.armbian.com/Developer-Guide_Building-with-Docker/

From the docker host:

# apt-get -y -qq install git
# git clone --depth 1 https://github.com/armbian/build 
# cd build
# ./compile.sh docker-shell 

You’ll end up in the docker container. Now run compile.sh again. Notice you are in the container now…

root@09c6235bb6ee:~/armbian# ./compile.sh BOARD=lepotato RELEASE=bullseye BRANCH=current KERNEL_CONFIGURE=yes

I also tried adding BOOTFS_TYPE=”fat” to the conf file so I could see the boot files on a PC beforehand:

root@09c6235bb6ee:~/armbian/build/config/boards# more nanopineoplus2.conf
#Allwinner H5 quad core 1GB RAM SoC headless GBE eMMC WiFi/BTBOARD_NAME="NanoPi Neo Plus 2"
BOARDFAMILY="sun50iw2"
BOOTCONFIG="nanopi_neo_plus2_defconfig"
MODULES="g_serial"
MODULES_BLACKLIST="lima"
DEFAULT_OVERLAYS="usbhost1 usbhost2"
DEFAULT_CONSOLE="serial"
SERIALCON="ttyS0,ttyGS0"
HAS_VIDEO_OUTPUT="no"
KERNEL_TARGET="legacy,current,edge"
BOOTFS_TYPE="fat"
root@09c6235bb6ee:~/armbian# ./compile.sh BOARD=nanopineoplus2 RELEASE=bullseye BRANCH=current KERNEL_CONFIGURE=yes

LePotato and NanoPi Neo Plus2 Goodness

Move OS to the NanoPi Neo Plus2 8GB emmc:

Get an Armbian Image for the NanoPi and boot it from the microSD. After initially configuring, run /sbin/nand-sata-install. Follow the prompts to copy the root filesystem to the emmc. Remove the SD card.

Installing DietPi to the 8GB eMMC flash on the NanoPi:

Booted into Armbian on the internal SD card and put The dietPi image in a USB to microSD dongle. The DietPi image was small, so I chose to create an fsarchiver image of it on the Armbian filesystem temporarily. This may or may not work for you if you don’t have enough space on the booted OS in the internal microSD card.

Use fdisk to see where the external microSD is and the eMMC. For me it was the following:

# fdisk -l
Disk /dev/mmcblk2: 7.28 GiB, 7818182656 bytes, 15269888 sectors
Units: sectors of 1 * 512 = 512 bytes
Sector size (logical/physical): 512 bytes / 512 bytes
I/O size (minimum/optimal): 512 bytes / 512 bytes
Disklabel type: dos
Disk identifier: 0xbc471ea2

Device         Boot Start      End  Sectors  Size Id Type
/dev/mmcblk2p1       8192 15106047 15097856  7.2G 83 Linux


Disk /dev/sda: 14.63 GiB, 15707668480 bytes, 30679040 sectors
Disk model: microSD RDR
Units: sectors of 1 * 512 = 512 bytes
Sector size (logical/physical): 512 bytes / 512 bytes
I/O size (minimum/optimal): 512 bytes / 512 bytes
Disklabel type: dos
Disk identifier: 0x74239350

Device     Boot Start      End  Sectors  Size Id Type
/dev/sda1        8192 30343168 30334977 14.5G 83 Linux


Disk /dev/mmcblk0: 59.48 GiB, 63864569856 bytes, 124735488 sectors
Units: sectors of 1 * 512 = 512 bytes
Sector size (logical/physical): 512 bytes / 512 bytes
I/O size (minimum/optimal): 512 bytes / 512 bytes
Disklabel type: dos
Disk identifier: 0x6337f038

Device         Boot Start      End  Sectors  Size Id Type
/dev/mmcblk0p1       2048 31110143 31108096 14.8G 83 Linux
#

It translated to this:

/dev/mmcblk0p1 — The Internal microSD Armbian boot device.
/dev/sda1 — The SD card with a DietPI image on the microSD
/dev/mmcblk2p — The eMMC (7.28 GiB)

Now create a fsarchiver backup of the DietPi image on /dev/sda1

# fsarchiver savefs -A -j4 -o /DietPi.fsa /dev/sda

Create a new ext4 partition on the eMMC drive using fdisk

# fdisk /dev/mmcblk2

Welcome to fdisk (util-linux 2.36.1).
Changes will remain in memory only, until you decide to write them.
Be careful before using the write command.

Command (m for help): p
Disk /dev/mmcblk2: 7.28 GiB, 7818182656 bytes, 15269888 sectors
Units: sectors of 1 * 512 = 512 bytes
Sector size (logical/physical): 512 bytes / 512 bytes
I/O size (minimum/optimal): 512 bytes / 512 bytes
Disklabel type: dos
Disk identifier: 0xbc471ea2

Device         Boot Start      End  Sectors  Size Id Type
/dev/mmcblk2p1       8192 15106047 15097856  7.2G 83 Linux

Command (m for help): d
Selected partition 1
Partition 1 has been deleted.

Command (m for help): n
Partition type
   p   primary (0 primary, 0 extended, 4 free)
   e   extended (container for logical partitions)
Select (default p): p
Partition number (1-4, default 1): 1
First sector (2048-15269887, default 2048): 8192
Last sector, +/-sectors or +/-size{K,M,G,T,P} (8192-15269887, default 15269887):

Created a new partition 1 of type 'Linux' and of size 7.3 GiB.

Command (m for help): p
Disk /dev/mmcblk2: 7.28 GiB, 7818182656 bytes, 15269888 sectors
Units: sectors of 1 * 512 = 512 bytes
Sector size (logical/physical): 512 bytes / 512 bytes
I/O size (minimum/optimal): 512 bytes / 512 bytes
Disklabel type: dos
Disk identifier: 0xbc471ea2

Device         Boot Start      End  Sectors  Size Id Type
/dev/mmcblk2p1       8192 15269887 15261696  7.3G 83 Linux

Command (m for help): w
The partition table has been altered.
Calling ioctl() to re-read partition table.
Syncing disks.
# 

Format the eMMC partition

# mkfs -t ext4 /dev/mmcblk2p1

Restore the fsarchiver image to the new partition:

# fsarchiver restfs /DietPi.fsa id=0,dest=/dev/sdb2

* files successfully processed:....regfiles=59379, directories=6999, symlinks=5774, hardlinks=331, specials=80
* files with errors:...............regfiles=0, directories=0, symlinks=0, hardlinks=0, specials=0

Finally -run nand-sata-install to get the boot record on the eMMC:

# /sbin/nand-sata-install

Once you say yes, it will execute and exit. Now poweroff, removed the SD cards, and see if it works!

# poweroff  

Unplug the nanoPi and Plug it back in. Hopefully it worked! Remember – the root password may be different now since you’re booting off the internal eMMC with DietPi


Home Lab KVM with MeshCommander

No Homelab Remote KVM? Intel Chipset? No Problem with Intel’s Management Engine and MeshCommander!

Mesh Commander is an application that can communicate to the Intel Management Engine (IME) available on most systems using an intel chipset. Once IME is configured, Mesh Commander will provide an entry point into the system and can provide a whole range of options from power cycling the system, remote controlling the system, and even accessing the BIOS. So how does it work? Here are the steps I go through to enable it:

Homelab Server Setup

In the system’s BIOS, look for Intel Management Engine (IME), Enable, then reset it. Make sure “Press <Ctrl-P> to Enter MEBx is enabled.

Take note of the key combination needed during the BIOS post. On my systems, to get into the IME settings, it’s <Ctrl-P>

The initial password is “admin” – Change it to your preferred password.

Go into the network settings and either keep the DHCP settings or use static IP. This is where it gets cool. The IME IP address will be enabled on the main ethernet port of the system ALONG WITH the IP the OS ends up using. And what’s even cooler? Say you disable the ethernet device in windows; it doesn’t disable the port. The port will remain available for IME functions.

Something I had to learn the hard way. If you plan on trunking multiple ethernet ports together, IME does not understand trunking/LACP/port aggregation, so it will not communicate properly.

MeshCommander Setup

Download the Windows MSI https://www.meshcommander.com/meshcommander

Install MeshCommander on your daily driver (regular client). There are other fancy options offered, but this will get you going.

Run MeshCommander

Add your home lab server to MeshCommand by manually entering the details with “Add Computer…” or be lazy and use “Scan…”

Click on the discovered systems and modify the settings. Use the password you set up earlier on the server.

Now Connect!

What to do, what to do… Remote Desktop? YES PLEASE!

If the screen is too small, you can change the font (debian):

dpkg-reconfigure console-setup

Other Tips

I had issues where the remote desktop does not work after Linux booted up and found it was due to the graphics driver disabling the GPU if no monitor detected. I couldn’t find a graceful work-around via software so I ended up going the HDMI Dummy Plug route. It terminates the HDMI lines so the system believes a monitor is there, and preventing the GPU from shutting down. https://a.co/d/9Cx13G7

Where’s the truth…

By not being on social media sites, I have a choice in what I consume from a news perspective. I want sources that give me the data to form my opinion rather than get opinions framed as news. So this is what works for me:

  1. Use a web browser “incognito” mode so tracking cookies aren’t used. This will help prevent news shaping. I use a web browser called Duck Duck Go that helps prevent tracking data from being used. I highly recommend using it for a browser on your phone and the search engine on your desktop. Once google has some history on you, the shaping algorithms will take hold quickly.
  2. I use multiple sources. If I watch CNN, I also try to watch Fox News and so on. It helps to see the different perspectives and the spin applied on all sides.
  3. For any of the “news” sites, I first look at the ad’s that I’m bombarded with. I want to determine right off the bat how the site makes money, and what generates the most revenue (typically its the product you see most of). They will usually not tell you directly, but you’ll get a sense of why they want you to buy while you stay on the site.
  4. I use Axios; they are trying to be a news source with little spin. You can see their mission statement here: https://www.axios.com/about/ They tell you how they gather information, how it’s gathered and qualified, and how they make money. Most of the content is short and concise with little fluff. I appreciate the attempt.
  5. I use allsides.com frequently. allsides is an aggregate site that tried to rate news stories as right, left, and center. It’s a good site to get an honest perspective on things. Their take is no news is unbiased, so they show you how. There was an exciting science project from Middle Schooler where they looked at bias in google search engine using data from allsides. More detail on the science project is located at:
    https://www.allsides.com/blog/teen-proves-media-bias-google-search-results-can-influence-political-opinions
  6. Is the content focused on the subject, and is the opinion kind? If the content attacks a person rather than a position, it’s typically because the position they are trying to make is weak and doesn’t hold up well on its own.

I’m sure I can keep rambling, but the above list encompasses most of what I do. Let me know if you have better methods!

zfs glory and snaphot hell

ZFS on TrueOS: Why We Love OpenZFS - TrueOS

This page is to document my trials with zfs snapshots for backup purposes. There a problem I found that entails when incremental snapshot sends are performed when the receive side has changed in some way. I’ll provide complete details soon. Good news my zfs retention script looks to be running well. I’ll document that as well soon. Here’s a teaser…

Living on a Raspberry Pi!

This feels a little weird!

Playing with the overclocking and it really makes a difference!  The settings below look stable but make the proc very hot (over 85 degrees c.)

From /boot/config.txt:

# Overclock settings – disabled until heat sink is added. 170327 SeanK
#arm_freq=1350
#core_freq=500
#over_voltage=4
#disable_splash=1
##force_turbo=1
#boot_delay=1
#sdram_freq=500

Also created a script to put the governor in ondemand mode and put it in the init.d directory:  Continue reading Living on a Raspberry Pi!

High School 1957 vs 2009

From a recent email spam – that was sorta funny…

Scenario 1:

Jack goes quail hunting before school and then pulls into the school parking lot with his shotgun in his truck’s gun rack.

1957 – Vice Principal comes over, looks at Jack’s shotgun, goes to his car and gets his new shotgun to show Jack.

2009 – School goes into lock down, FBI called, Jack hauled off to jail and never sees his truck or gun again. Counselors called in for traumatized students and teachers.

Scenario 2:

Johnny and Mark get into a fist fight after school…

1957 – Crowd gathers.. Mark wins. Johnny and Mark shake hands and end up buddies.

2009 – Police called and SWAT team arrives — they arrest both Johnny and Mark.. They are both charged them with assault and both expelled even though Johnny started it.

Scenario 3:

Jeffrey will not be still in class, he disrupts other students.

1957 – Jeffrey sent to the Principal’s office and given a good paddling by the Principal. He then returns to class, sits still and does not disrupt class again..

2009 – Jeffrey is given huge doses of Ritalin. He becomes a zombie. He is then tested for ADD. The school gets extra money from the state because Jeffrey has a disability.

Scenario 4:

Billy breaks a window in his neighbor’s car and his Dad gives him a whipping with his belt.

1957 – Billy is more careful next time, grows up normal, goes to college and becomes a successful businessman.

2009 – Billy’s dad is arrested for child abuse. Billy is removed to foster care and joins a gang. The state psychologist is told by Billy’s sister that she remembers being abused herself and their dad goes to prison. Billy’s mom has an affair with the psychologist.

Scenario 5:

Mark gets a headache and takes some aspirin to school.

1957 – Mark shares his aspirin with the Principal out on the smoking dock.

2009 – The police are called and Mark is expelled from school for drug violations. His car is then searched for drugs and weapons.

Scenario 6:

Pedro fails high school English.

1957 – Pedro goes to summer school, passes English and goes to college.

2009 – Pedro’s cause is taken up by state. Newspaper articles appear nationally explaining that teaching English as a requirement for graduation is racist. ACLU files class action lawsuit against the state school system and Pedro’s English teacher . English is then banned from core curriculum. Pedro is given his diploma anyway but ends up mowing lawns for a living because he cannot speak English.

Scenario 7:

Johnny takes apart leftover firecrackers from the Fourth of July, puts them in a model airplane paint bottle and blows up a red ant bed..

1957 – Ants die.

2009 – ATF, Homeland Security and the FBI are all called. Johnny is charged with domestic terrorism. The FBI investigates his parents — and all siblings are removed from their home and all computers are confiscated. Johnny’s dad is placed on a terror watch list and is never allowed to fly again.

Using rsync for replication on OS X

I recently began a quest to replicate my house data with a hosting service so if my house goes up in a fire I still have my data elsewhere. The utility that seems to work the best for this is called rsync, and is available on most flavors of Unix, including Apple’s OS X. Why is it good?  Well, rsync talks to the remote host and compares file meta-data like modified times, checksums, etc. to determine if a file needs to be transmitted.  It can handle partial file retransmission which is very nice if your dealing with large files.  It’s much more efficient than other methods that clumsily send all data over the line to have the destination server determine if the data should be discarded or not.  Here’s an example of the command I use (disk1 is a directory with a bunch of directories and files):

superbooky:Sean$ rsync -P -z -a -v -e "ssh -l sshuser"           \
                       --partial --delete-after --max-delete=500 \
                       /Volumes/disk1 bubba.com:~/disk1

While the command switches look scary, they really aren’t that bad. Here’s the explanation:

-P = Display

-z = Compress the data stream

-a = Archive mode – enables switches -rlptgoD
recurse dirs, copy symlinks, preserve permissions:mod times:group:owner:special files

-v = Increase verbosity

-e “ssh -l sshuser” = Run rsync through ssh for encrypted transfers

–partial = Leave partial files on the destination side.  This is to allow rsync to simply continue the transfer if a transmission interuption occurs. If you have large multi-GB files this is invaluable.

–delete-after = Delete any files on the destination that were deleted locally after all files have been replicated rather that during the replication.

–max-delete=500 = If rsync starts it’s deletion and goes more than 50 files, exit with an error.  This is a safegaurd in case something weird happens.

Using windows?  Sorry there’s no simple equivalent that is just available.  You’ll need to install software to get this type functionality

The 4th Electrical Element, Memristor

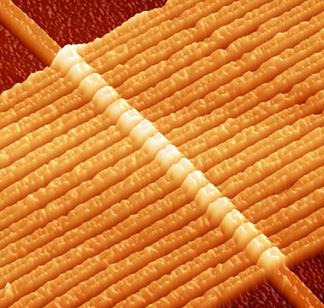
Last year HP Labs was able to create the long theorized electrical element, the Memristor.  While most people have not heard anything about the memristor, it will soon change the whole face of our electronics world.  The Memristor was a theoretical element in electronics that was postulated in the late 1960’s and was finally created in 2008.  Our entire electronics work today is only based on the other 3 elements – Resistor, Capacitor, and Inductor.

Why should you care?

Imagine your next computer with 10 terabytes of RAM, with no hard drive and no need to “load” programs.  Imagine the same computer powered off without loosing any information, requiring no voltage draw and at a fraction of the size of the smallest computers today – heck I could have described the iPhone of the future.

That’s just the tip of the iceberg.  Analog processors, extremely fast crossbars, and others are on the near horizon. 20-50 years?  No.  I’m talking about the next 2-5 years.

Here’s a few links regarding the memristor:

Twitter Weekly Updates for 2009-04-05

  • Off to the Glenn to Celebrate Rachelle’s B-day. Earlier I started work on my main wing assembly for the F4U Corsair. 2 weeks to flight! #
  • Just got to my hotel in Ft. Lauderdale Florida. Feeling kinda sick. Hopefully it’s just jet crud #
  • Wrapping up at the customer site in Ft Lauderdale. Going home tomorrow! #

Powered by Twitter Tools.