Octoprint container in Debian Windows WSL 2 and Docker Desktop

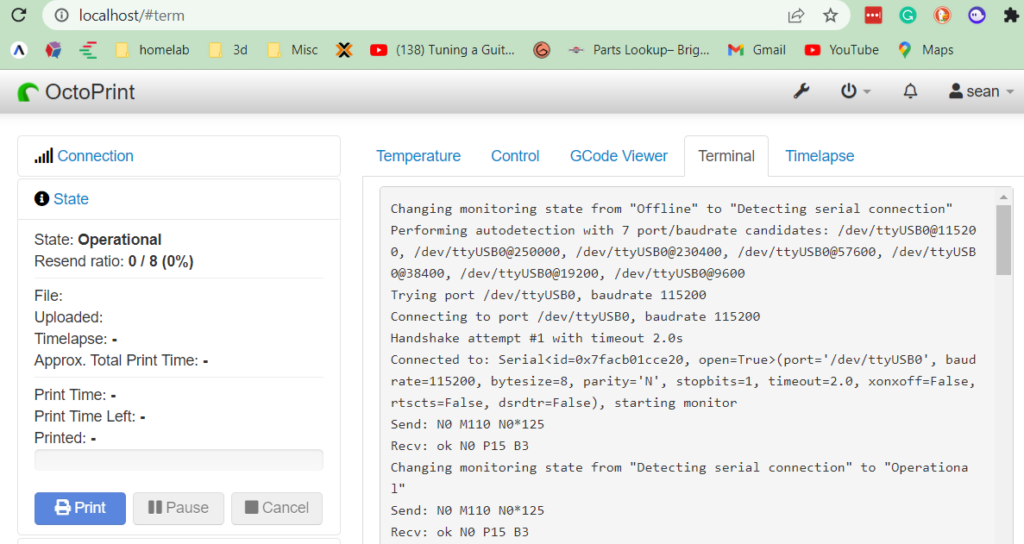
Here’s a list of steps to get octoprint to run within a container on Windows. I happen to have a windows system running next to my ender so instead of infinitely waiting for a raspberry pi I decided to run octoprint in a container within windows – if possible. Using Debian was a challenge, but I prefer it over Ubuntu, so I took the extra time to figure it out. Enjoy!

Get USB serial device into Debian

PowerShell (Admin)

PS C> winget install --interactive --exact dorssel.usbipd-win

Debian:

$ sudo apt-get install usbutils hwdata usbip

Powershell Admin:

PS C> usbipd wsl list
BUSID  VID:PID    DEVICE                                                        STATE
1-1    046d:c545  USB Input Device                                              Not attached
1-2    2357:0138  TP-Link Wireless MU-MIMO USB Adapter                          Not attached
1-4    1bcf:28c4  FHD Camera, FHD Camera Microphone                             Not attached
1-5    1a86:7523  USB-SERIAL CH340 (COM4)                                       Not attached
1-13   046d:c52b  Logitech USB Input Device, USB Input Device                   Not attached

PS C> usbipd wsl attach --busid 1-4
usbipd: info: Using default distribution 'Debian'.

PS C> usbipd wsl attach --busid 1-5
usbipd: info: Using default distribution 'Debian'.

PS C> usbipd wsl list
BUSID  VID:PID    DEVICE                                                        STATE
1-1    046d:c545  USB Input Device                                              Not attached
1-2    2357:0138  TP-Link Wireless MU-MIMO USB Adapter                          Not attached
1-4    1bcf:28c4  FHD Camera, FHD Camera Microphone                             Attached - Debian
1-5    1a86:7523  USB-SERIAL CH340 (COM4)                                       Attached - Debian
1-13   046d:c52b  Logitech USB Input Device, USB Input Device                   Not attached
1-23   0bda:9210  USB Attached SCSI (UAS) Mass Storage Device                   Not attached

Debian:

# lsusb
Bus 002 Device 001: ID 1d6b:0003 Linux Foundation 3.0 root hub
Bus 001 Device 002: ID 1bcf:28c4 Sunplus Innovation Technology Inc. FHD Camera Microphone
Bus 001 Device 001: ID 1d6b:0002 Linux Foundation 2.0 root hub

# python3 -m serial.tools.miniterm


--- Available ports:
---  1: /dev/ttyUSB0         'USB Serial'

docker-compose.yml

version: '2.4'

services:
  octoprint:
    image: octoprint/octoprint
    restart: unless-stopped
    ports:
      - 80:80
    devices:
    # use `python3 -m serial.tools.miniterm` , this requires pyserial
    #  - /dev/ttyACM0:/dev/ttyACM0
    #  - /dev/video0:/dev/video0
      - /dev/ttyUSB0
    volumes:
     - octoprint:/octoprint
    #environment:
    #  - ENABLE_MJPG_STREAMER=true

  ####
  # uncomment if you wish to edit the configuration files of octoprint
  # refer to docs on configuration editing for more information
  ####

  #config-editor:
  #  image: linuxserver/code-server
  #  ports:
  #    - 8443:8443
  #  depends_on:
  #    - octoprint
  #  restart: unless-stopped
  #  environment:
  #    - PUID=0
  #    - GUID=0
  #    - TZ=America/Chicago
  #  volumes:
  #    - octoprint:/octoprint

volumes:
  octoprint:

Success!

Docker volume backup and restore the easy way.

I haven’t had to move docker volumes around in a few years, but I finally had the need today. As usual, I searched for the process, knowing that most examples are… well… not very good. Well, as I almost resorted to pulling a manual job using ubuntu, I found a great write-up by Jarek Lipski on Medium. Here’s how you backup using alpine and tar. Also, make sure you “docker stop” the containers that use the volume, so you get a consistent backup.

Which containers use a volume?

docker ps -a --filter volume=[some_volume]

Backup using an alpine image with tar:

docker run --rm -v [some_volume]:/volume -v /tmp:/backup alpine tar -cjf /backup/[some_archive].tar.bz2 -C /volume ./

Restore:

docker run --rm -v [some_volume]:/volume -v /tmp:/backup alpine sh -c "rm -rf /volume/* /volume/..?* /volume/.[!.]* ; tar -C /volume/ -xjf /backup/[some_archive].tar.bz2"

Backup using loomchild/volume-backup

I love that Jarek also created an image to simplify further the process called loomchild/volume-backup. Here’s how the image works:

docker run -v [volume-name]:/volume -v [output-dir]:/backup --rm loomchild/volume-backup backup [archive-name]

Restore:

docker run -v [volume-name]:/volume -v [output-dir]:/backup --rm loomchild/volume-backup restore [archive-name]

What’s great is this method allows inline copying of a volume from one system to another using ssh. Here’s an example Jarek provides:

docker run -v some_volume:/volume --rm --log-driver none loomchild/volume-backup backup -c none - |\
     ssh user@new.machine docker run -i -v some_volume:/volume --rm loomchild/volume-backup restore -c none -

Password-less ssh in 2 Glorious Steps…

Local System – Let’s call it alpha
Remote System we don’t want to have to enter passwords for,
Let’s call it foxtrot

Prep: Harden your existing ssh keys since RSA 1024 sucks. This will create a new 4096 version – ed22519 is actually preferred so you can skip the rsa creation if preferred.

me@alpha$ mv ~/.ssh/id_rsa ~/.ssh/id_rsa_legacy
me@alpha$ mv ~/.ssh/id_rsa.pub ~/.ssh/id_rsa_legacy.pub

Step 1: Generate new keys:

me@alpha$ ssh-keygen -t rsa -b 4096 -o -a 100   #RSA version

me@alpha$ ssh-keygen -o -a 100 -t ed25519 #Preferred ed25519 version

Step 2: Copy the Ed25519  keys to the remote system called foxtrot:

me@alpha$ ssh-copy-id -i ~/.ssh/id_ed25519.pub me@foxtrot

If ssh-copy-id is not available (powershell, etc.) manually copy the public key to the other host:

me@alpha$ cat ~/.ssh/id_ed25519.pub | ssh me@foxtrot "cat >> ~/.ssh/authorized_keys"


DONE!
 Now verify you can actually ssh without a password:

me@alpha$ ssh me@foxtrot
me@foxtrot:~$ hostname
foxtrot
me@foxtrot:~$

You can also check your ~/.ssh/authorized_key file for duplicate or old entries, especially if you used old garbage RSA 1024 or less keys in the past.

Additional Reference: Manually copy the keys (This will ask you the password of the user you have mentioned):

me@alpha$ scp ~/.ssh/id_ed25519.pub me@foxtrot:~
me@alpha$ cat id_rsa.pub >> /home/user/.ssh/authorized_keys

Fancy way of doing the same thing (tee takes stdin and appends it to file):

me@alpha$ cat ~/.ssh/id_ed25519.pub | ssh jarvis tee -a ~/.ssh/authorized_keys

Wait… what about powershell? 

ssh-copy-id isn’t available so you can use the following:

$publicKey = Get-Content $env:USERPROFILE\.ssh\id_ed25519.pub
/authorized_keys"

ssh user@remotehost "mkdir -p ~/.ssh; echo '$publicKey' >> ~/.ssh/authorized_keys; chmod 700 ~/.ssh; chmod 600 ~/.ssh

Thanks to the following sites for easily explaining this process:
https://www.thegeekstuff.com/2008/11/3-steps-to-perform-ssh-login-without-password-using-ssh-keygen-ssh-copy-id/
https://blog.g3rt.nl/upgrade-your-ssh-keys.html
https://www.ionos.com/digitalguide/server/security/using-ssh-keys-for-your-network-connection/